Physical Address
42°26′05″N 83°59′06″W
Physical Address
42°26′05″N 83°59′06″W
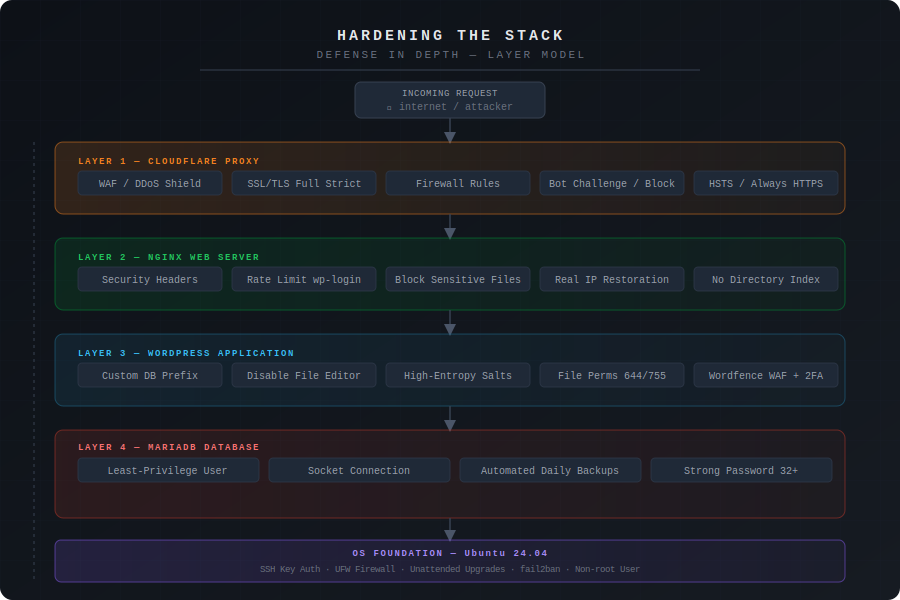
A default WordPress installation is a target. To move from “vulnerable” to “hardened,” we must secure the entire stack: the Operating System, the Web Server, the Database, and the Application itself. This guide follows the official WordPress hardening standards to build a fortress, not just a website.
Environment: DigitalOcean Droplet running Ubuntu 24.04, Nginx web server, MariaDB database, managed through Cloudflare (DNS + proxy).
Before touching WordPress, you must secure the host. If the server is compromised, the application doesn’t matter.
Standard password logins are susceptible to brute-force attacks. We replace “what you know” (password) with “what you have” (private key).
Action: Disable password-based authentication.
Implementation:
sudo nano /etc/ssh/sshd_config
Find and modify these lines:
PasswordAuthentication no
PubkeyAuthentication yes
PermitRootLogin no
Restart SSH:
sudo systemctl restart ssh
Verification: Try logging in from a different machine without a key – it should fail.
Ubuntu’s Uncomplicated Firewall (UFW) provides a simple interface for iptables. The principle: deny everything except what you explicitly need.
Action: Configure UFW to allow only HTTP, HTTPS, and SSH.
Implementation:
# Check status first
sudo ufw status
# Default policies: deny incoming, allow outgoing
sudo ufw default deny incoming
sudo ufw default allow outgoing
# Allow SSH (do this FIRST to avoid locking yourself out)
sudo ufw allow 22/tcp
# Allow HTTP and HTTPS
sudo ufw allow 80/tcp
sudo ufw allow 443/tcp
# Enable the firewall
sudo ufw enable
# Verify rules
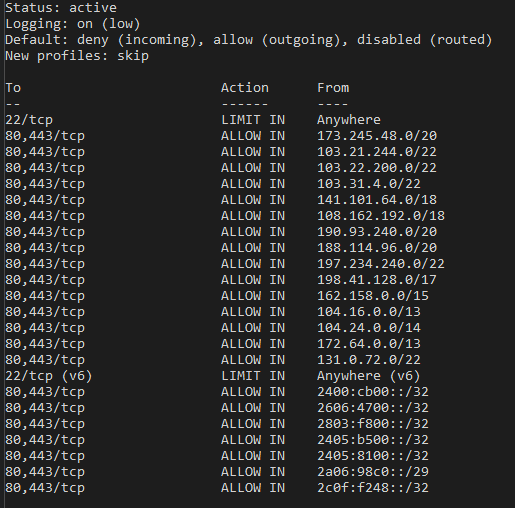
sudo ufw status verbose
Expected output:
To                         Action      From
--                         ------      ----
22/tcp                     ALLOW       Anywhere
80/tcp                     ALLOW       Anywhere
443/tcp                    ALLOW       Anywhere
Critical: If you’re using a non-standard SSH port, adjust accordingly. If you use Cloudflare’s proxy (orange cloud), you can optionally restrict port 80/443 to Cloudflare’s IP ranges for additional protection.
The WordPress Codex emphasizes keeping server software current. We use unattended-upgrades to ensure the OS patches itself.
Action: Enable automated security patching.
Implementation:
sudo apt install unattended-upgrades
sudo dpkg-reconfigure -plow unattended-upgrades
Select “Yes” when prompted. This configures automatic installation of security updates only.
Verification:
sudo systemctl status unattended-upgrades
Configuration file location: /etc/apt/apt.conf.d/50unattended-upgrades
You can optionally configure email notifications for update failures. This is crucial for a production site.
The web server is the gatekeeper. By configuring Nginx properly, we stop attacks before they reach the WordPress PHP engine.
We use HTTP headers to instruct the visitor’s browser to block common exploitation techniques.
Action: Add protection against Clickjacking, MIME-sniffing, and referrer leakage.
Location: Add to your Nginx server block (typically in /etc/nginx/sites-available/[your_domain])
Configuration:
server {
    listen 443 ssl http2;
    server_name [your_domain].com www.[your_domain].com;

    # Security Headers
    add_header X-Frame-Options "SAMEORIGIN" always;
    add_header X-Content-Type-Options "nosniff" always;
    add_header Referrer-Policy "strict-origin-when-cross-origin" always;
    add_header X-XSS-Protection "1; mode=block" always;

    # Additional recommended headers
    add_header Permissions-Policy "geolocation=(), microphone=(), camera=()" always;

    # Rest of your configuration...
}
Header explanations:
X-Frame-Options: Prevents your site from being embedded in iframes (clickjacking protection)X-Content-Type-Options: Prevents browsers from MIME-sniffing (changing file types)Referrer-Policy: Controls how much referrer information is sentX-XSS-Protection: Enables browser’s built-in XSS filter (legacy, but doesn’t hurt)Permissions-Policy: Disables unnecessary browser featuresTest after applying:
sudo nginx -t
sudo systemctl reload nginx
Prevent attackers from browsing your directory structure.
Action: Ensure autoindex is disabled globally.
Configuration: In your main nginx.conf (/etc/nginx/nginx.conf) or site config:
autoindex off;
Test: Navigate to https://[your_domain].com/wp-content/uploads/ – you should get a 403 Forbidden, not a file listing.
Nginx should never serve files like .htaccess, wp-config.php, or other sensitive items.
Configuration: Add to your server block:
# Block access to hidden files
location ~ /\. {
    deny all;
}

# Block access to wp-config.php
location = /wp-config.php {
    deny all;
}

# Block access to readme/license files
location ~* ^/readme\.(txt|html)$ {
    deny all;
}

location ~* ^/license\.txt$ {
    deny all;
}
Protect against brute-force login attempts at the web server level.
Configuration: In your http block in nginx.conf:
# Define rate limit zone (outside server block)
limit_req_zone $binary_remote_addr zone=wp_login:10m rate=3r/m;

# In your server block, apply to wp-login.php
location = /wp-login.php {
    limit_req zone=wp_login burst=5;
    include fastcgi_params;
    fastcgi_pass unix:/var/run/php/php8.3-fpm.sock;
}
This limits login attempts to 3 per minute per IP, with a burst allowance of 5.
Note: Adjust the PHP-FPM socket path to match your PHP version (e.g., php8.1-fpm.sock, php8.2-fpm.sock, php8.3-fpm.sock).

Now we move into wp-config.php and the WordPress filesystem, following the principle of Least Privilege.
Automated SQL Injection (SQLi) attacks assume your tables start with wp_. Changing this breaks the vast majority of automated scripts.
Technical Pitfall: Failing to update internal meta references will lock you out of the admin dashboard. Always backup before this operation. Complete all changes before applying and updating.
Action: Change the prefix and rename all tables.
Step 1: Update wp-config.php:
$table_prefix = 'AB_';
Step 2: Rename all database tables:
-- Connect to MySQL
mysql -u [wordpress_user] -p [wordpress_db]

-- Rename core tables
RENAME TABLE wp_users TO AB_users;
RENAME TABLE wp_posts TO AB_posts;
RENAME TABLE wp_postmeta TO AB_postmeta;
RENAME TABLE wp_usermeta TO AB_usermeta;
RENAME TABLE wp_comments TO AB_comments;
RENAME TABLE wp_commentmeta TO AB_commentmeta;
RENAME TABLE wp_terms TO AB_terms;
RENAME TABLE wp_term_taxonomy TO AB_term_taxonomy;
RENAME TABLE wp_term_relationships TO AB_term_relationships;
RENAME TABLE wp_termmeta TO AB_termmeta;
RENAME TABLE wp_options TO AB_options;
RENAME TABLE wp_links TO AB_links;
Step 3 (Critical): Update internal WordPress references:
-- Update options table
UPDATE AB_options
SET option_name = 'AB_user_roles'
WHERE option_name = 'wp_user_roles';

-- Update user meta keys
UPDATE AB_usermeta
SET meta_key = REPLACE(meta_key, 'wp_', 'AB_');
Step 4: If using plugins (e.g., Wordfence, LiteSpeed Cache), you must also rename their tables:
-- Example for Wordfence
RENAME TABLE wp_wfconfig TO AB_wfconfig;
RENAME TABLE wp_wfblocks7 TO AB_wfblocks7;
-- Check SHOW TABLES; for all plugin tables and rename accordingly
Salts encrypt the information stored in user cookies. Default or weak salts are a security risk.
Action: Regenerate secret keys using WordPress’s official API.
Implementation:
# Visit this URL to generate fresh salts (in a browser or via curl)
# https://api.wordpress.org/secret-key/1.1/salt/

# Edit wp-config.php
sudo nano /var/www/[your_wordpress_directory]/wp-config.php
Replace this entire block:
define('AUTH_KEY',         'put your unique phrase here');
define('SECURE_AUTH_KEY',  'put your unique phrase here');
define('LOGGED_IN_KEY',    'put your unique phrase here');
define('NONCE_KEY',        'put your unique phrase here');
define('AUTH_SALT',        'put your unique phrase here');
define('SECURE_AUTH_SALT', 'put your unique phrase here');
define('LOGGED_IN_SALT',   'put your unique phrase here');
define('NONCE_SALT',       'put your unique phrase here');
With fresh values from the API. Each key should be a 64-character random string.
Impact: Regenerating salts will log out all users. Schedule this during maintenance.
The WordPress dashboard allows administrators to edit PHP files (plugins, themes) by default. This is the first tool an attacker uses if they compromise an admin account.
Action: Disable the built-in code editor.
Implementation: Add to wp-config.php (above the /* That's all, stop editing! */ line):
// Disable file editing
define('DISALLOW_FILE_EDIT', true);
Verification: Log into WordPress admin → Appearance. The “Theme File Editor” option should be gone.
Trade-off: You’ll need SFTP/SSH access to edit theme files. This is actually proper practice anyway.
Incorrect file permissions are one of the most common vulnerabilities. The rule: only the files that absolutely need to be writable should be writable.
Action: Set restrictive permissions on WordPress files.
Implementation:
# Navigate to WordPress root
cd /var/www/[your_wordpress_directory]

# Set ownership (replace 'www-data' with your web server user if different)
sudo chown -R www-data:www-data .

# Set directory permissions to 755 (owner: rwx, group/others: rx)
find . -type d -exec chmod 755 {} \;

# Set file permissions to 644 (owner: rw, group/others: r)
find . -type f -exec chmod 644 {} \;

# Special case: wp-config.php should be 440 or 400 (read-only, not world-readable)
chmod 440 wp-config.php

# Verify critical files
ls -la wp-config.php
# Should show: -r--r----- (440)
Permission breakdown:
755 for directories: Owner can read/write/execute, others can read/execute644 for files: Owner can read/write, others can only read440 for wp-config.php: Only owner and group can read, no one can writeWriteable directories (WordPress needs these for uploads, cache, etc.):
chmod 755 wp-content/uploads
chmod 755 wp-content/cache  # if you use caching
If using a plugin that requires write access to specific directories, only grant it there. Never make the entire wp-content writable.
Beyond salts and file editing, there are several other hardening constants.
Add these to wp-config.php:
// --- Hardening Constants ---

// Disable plugin/theme installation from dashboard (set to true after initial setup)
define('DISALLOW_FILE_MODS', false);

// Force SSL for admin area (if using HTTPS, which you should be)
define('FORCE_SSL_ADMIN', true);

// Limit post revisions to save database space
define('WP_POST_REVISIONS', 3);

// Set auto-save interval (default is 60 seconds, increase to reduce DB writes)
define('AUTOSAVE_INTERVAL', 300); // 5 minutes
For Nginx users: To disable PHP execution in uploads, add to your Nginx config:
location ~* /wp-content/uploads/.*\.php$ {
    deny all;
}
Database integrity is paramount. We must ensure proper privilege separation and backup procedures.
For normal WordPress operations (posting, uploading media, installing plugins), the MySQL user only needs: SELECT, INSERT, UPDATE, DELETE.
Dangerous privileges like DROP, ALTER, GRANT should be revoked.
Action: Create a separate admin user for schema changes, use a restricted user for WordPress.
Implementation:
-- Connect to MySQL as root
sudo mysql -u root

-- Check current privileges
SHOW GRANTS FOR '[wordpress_user]'@'localhost';

-- If the user has excessive privileges, revoke them
REVOKE ALL PRIVILEGES ON [wordpress_db].* FROM '[wordpress_user]'@'localhost';

-- Grant only necessary privileges
GRANT SELECT, INSERT, UPDATE, DELETE ON [wordpress_db].* TO '[wordpress_user]'@'localhost';

-- Apply changes
FLUSH PRIVILEGES;

-- Exit
EXIT;
Critical caveat: Major WordPress updates and some plugins require ALTER and CREATE to modify the database schema. Before running updates:
GRANT ALL PRIVILEGES ON [wordpress_db].* TO '[wordpress_user]'@'localhost';
FLUSH PRIVILEGES;
REVOKE ALTER, CREATE, DROP, INDEX ON [wordpress_db].* FROM '[wordpress_user]'@'localhost';
FLUSH PRIVILEGES;
Better approach for advanced users: Use two database users – one restricted for runtime, one with full access for updates. Switch between them in wp-config.php as needed.
No hardening guide is complete without backups. The question isn’t if you’ll need them, it’s when.
Action: Set up automated database backups with off-site storage.
Implementation (using mysqldump):
# Create backup directory
sudo mkdir -p /var/backups/wordpress
sudo chown $(whoami):$(whoami) /var/backups/wordpress

# Create backup script
sudo nano /usr/local/bin/backup-wordpress-db.sh
Backup script:
#!/bin/bash
BACKUP_DIR="/var/backups/wordpress"
DB_NAME="[wordpress_db]"
DB_USER="[wordpress_user]"
DB_PASS="[your_db_password]"  # Better: read from secure file
DATE=$(date +%Y%m%d_%H%M%S)
FILENAME="wp_backup_$DATE.sql.gz"

# Dump and compress
mysqldump -u $DB_USER -p$DB_PASS $DB_NAME | gzip > $BACKUP_DIR/$FILENAME

# Keep only last 7 days
find $BACKUP_DIR -name "wp_backup_*.sql.gz" -mtime +7 -delete

# Optional: Upload to remote storage (S3, Backblaze, etc.)
# aws s3 cp $BACKUP_DIR/$FILENAME s3://your-bucket/backups/
Make executable and schedule:
sudo chmod +x /usr/local/bin/backup-wordpress-db.sh

# Add to crontab (daily at 2 AM)
crontab -e
Add line:
0 2 * * * /usr/local/bin/backup-wordpress-db.sh
Security note: Never store database credentials in plain text. Use a secrets manager or at minimum a restricted-permission file.
Ensure WordPress connects to MySQL over localhost (Unix socket) rather than TCP, and uses a strong password.
In wp-config.php:
define('DB_HOST', 'localhost'); // or '127.0.0.1' - both use socket by default
Generate strong database password:
openssl rand -base64 32
Update the password in both wp-config.php and MySQL:
ALTER USER '[wordpress_user]'@'localhost' IDENTIFIED BY 'new_strong_password';
FLUSH PRIVILEGES;
A hardened site requires continuous vigilance. Security is not a one-time configuration.
When issues arise, logs are your forensic evidence.
Action: Configure centralized logging and regular review.
Log locations:
/var/log/nginx/access.log/var/log/nginx/error.log/var/log/php8.3-fpm.log (adjust version number)Real-time monitoring:
# Monitor Nginx errors
sudo tail -f /var/log/nginx/error.log

# Watch rate limiter in action
sudo tail -f /var/log/nginx/access.log | grep "503"

# Monitor all Nginx access (useful during attacks)
sudo tail -f /var/log/nginx/access.log

# Filter for failed login attempts
sudo grep "wp-login.php" /var/log/nginx/access.log | grep "POST"

# PHP health check (adjust to your PHP version)
sudo tail -f /var/log/php8.3-fpm.log
Setting log rotation (prevents logs from filling disk):
# Nginx logs are rotated by default via logrotate
cat /etc/logrotate.d/nginx
sudo apt install fail2ban

# Create WordPress jail
sudo nano /etc/fail2ban/jail.local
Fail2ban WordPress jail configuration:
[wordpress-auth]
enabled = true
filter = wordpress-auth
logpath = /var/log/nginx/access.log
maxretry = 3
bantime = 3600
findtime = 600
Create the filter:
sudo nano /etc/fail2ban/filter.d/wordpress-auth.conf
[Definition]
failregex = ^<HOST> .* "POST /wp-login.php
ignoreregex =
Restart fail2ban:
sudo systemctl restart fail2ban
sudo fail2ban-client status wordpress-auth
The Problem: If you’re using Cloudflare in proxy mode (orange cloud), Nginx sees all requests coming from Cloudflare’s IP addresses, not the actual visitor’s IP. This breaks fail2ban because:
The Solution: Configure Nginx to trust Cloudflare’s proxy headers and extract the real visitor IP using the ngx_http_realip_module.
Action: Configure Nginx to restore real IPs from Cloudflare headers.
Implementation:
First, verify the realip module is available:
nginx -V 2>&1 | grep -o with-http_realip_module
# Should output: with-http_realip_module
Create a Cloudflare IP configuration file:
sudo nano /etc/nginx/cloudflare-realip.conf
Add Cloudflare’s current IP ranges:
# Cloudflare IPv4 ranges
set_real_ip_from 173.245.48.0/20;
set_real_ip_from 103.21.244.0/22;
set_real_ip_from 103.22.200.0/22;
set_real_ip_from 103.31.4.0/22;
set_real_ip_from 141.101.64.0/18;
set_real_ip_from 108.162.192.0/18;
set_real_ip_from 190.93.240.0/20;
set_real_ip_from 188.114.96.0/20;
set_real_ip_from 197.234.240.0/22;
set_real_ip_from 198.41.128.0/17;
set_real_ip_from 162.158.0.0/15;
set_real_ip_from 104.16.0.0/13;
set_real_ip_from 104.24.0.0/14;
set_real_ip_from 172.64.0.0/13;
set_real_ip_from 131.0.72.0/22;

# Cloudflare IPv6 ranges
set_real_ip_from 2400:cb00::/32;
set_real_ip_from 2606:4700::/32;
set_real_ip_from 2803:f800::/32;
set_real_ip_from 2405:b500::/32;
set_real_ip_from 2405:8100::/32;
set_real_ip_from 2a06:98c0::/29;
set_real_ip_from 2c0f:f248::/32;

# Use the CF-Connecting-IP header (Cloudflare's real IP header)
real_ip_header CF-Connecting-IP;

# Use X-Forwarded-For as fallback
# real_ip_header X-Forwarded-For;

# Don't trust any other proxies
real_ip_recursive off;
Note: Cloudflare updates their IP ranges occasionally. Get the current list from: https://www.cloudflare.com/ips/
Include in your main Nginx configuration:
sudo nano /etc/nginx/nginx.conf
Add inside the http block (before your server blocks):
http {
    # ... other settings ...

    # Cloudflare real IP restoration
    include /etc/nginx/cloudflare-realip.conf;

    # ... rest of config ...
}
Test and reload Nginx:
sudo nginx -t
sudo systemctl reload nginx
Verification:
Check that Nginx is now logging real IPs:
# Watch access log
sudo tail -f /var/log/nginx/access.log
# Visit your site from your phone/computer
# You should see YOUR actual IP, not a Cloudflare IP (104.16.x.x)
Test fail2ban sees real IPs:
# Intentionally fail a login 3+ times from your test machine
# Then check fail2ban log
sudo tail -f /var/log/fail2ban.log

# Check if YOUR IP got banned (not Cloudflare's)
sudo fail2ban-client status wordpress-auth
# Should show your actual IP in the banned list
Unban yourself if needed:
sudo fail2ban-client set wordpress-auth unbanip YOUR_IP_ADDRESS
Security note: Only trust Cloudflare IPs if you’re actually behind Cloudflare. If an attacker bypasses Cloudflare and connects directly to your origin server, they could spoof the CF-Connecting-IP header. Protect against this by:
# UFW example - allow only Cloudflare
sudo ufw default deny incoming
sudo ufw allow from 173.245.48.0/20 to any port 80
sudo ufw allow from 173.245.48.0/20 to any port 443
# ... repeat for all Cloudflare ranges ...
# Or use a script: https://github.com/Paul-Reed/cloudflare-ufw
Alternative approach: If you don’t want to maintain Cloudflare IP lists, use their API to automatically update:
# Create update script
sudo nano /usr/local/bin/update-cloudflare-ips.sh
#!/bin/bash
CF_IPSV4_URL="https://www.cloudflare.com/ips-v4"
CF_IPSV6_URL="https://www.cloudflare.com/ips-v6"
CONF_FILE="/etc/nginx/cloudflare-realip.conf"

# Fetch current IPs
echo "# Auto-generated Cloudflare IPs - $(date)" > $CONF_FILE
echo "" >> $CONF_FILE
echo "# IPv4" >> $CONF_FILE
for ip in $(curl -s $CF_IPSV4_URL); do
    echo "set_real_ip_from $ip;" >> $CONF_FILE
done
echo "" >> $CONF_FILE
echo "# IPv6" >> $CONF_FILE
for ip in $(curl -s $CF_IPSV6_URL); do
    echo "set_real_ip_from $ip;" >> $CONF_FILE
done
echo "" >> $CONF_FILE
echo "real_ip_header CF-Connecting-IP;" >> $CONF_FILE
echo "real_ip_recursive off;" >> $CONF_FILE

# Test and reload Nginx
nginx -t && systemctl reload nginx
Make executable and schedule monthly:
sudo chmod +x /usr/local/bin/update-cloudflare-ips.sh
sudo crontab -e
# Add: 0 3 1 * * /usr/local/bin/update-cloudflare-ips.sh
Defense in depth means layering multiple security measures. Here are recommended plugins:
1. Wordfence Security (Free)
Installation:
# Via WP-CLI (if installed)
wp plugin install wordfence --activate --allow-root

# Or via dashboard: Plugins → Add New → Search "Wordfence"
Configuration priorities:
2. Alternative: Solid Security (formerly iThemes Security)
Pick one WAF plugin, not both. Running multiple security plugins can cause conflicts.
Detect unauthorized changes to core WordPress files.
Action: Use WordPress’s built-in file verification.
Via WP-CLI: (run from within the web root /var/www/[your_domain])
# Verify core files (detects modifications)
wp core verify-checksums --allow-root

# Example output shows modified files:
# Warning: File doesn't verify against checksum: wp-admin/admin.php
For continuous monitoring, install a plugin like WP Security Audit Log or use OSSEC (advanced, server-level).
This is basic but critical. Most compromises exploit known, patched vulnerabilities.
Enable automatic updates for minor versions (in wp-config.php):
// Auto-update minor core releases (e.g., 6.4.1 to 6.4.2)
define('WP_AUTO_UPDATE_CORE', 'minor');

// To enable major updates (use with caution):
// define('WP_AUTO_UPDATE_CORE', true);
Plugin updates: Review release notes before updating, especially for major versions. Test on staging first if possible.
Via WP-CLI (safer for automation):
# Update WordPress core
wp core update --allow-root

# Update all plugins
wp plugin update --all --allow-root

# Update all themes
wp theme update --all --allow-root
Real-world incident: After implementing the database prefix change, the site returned a 502 error.
Root cause: Wordfence couldn’t find its configuration tables because they still had the wp_ prefix while WordPress was looking for AB_ tables.
Investigation:
# Check Nginx error log
sudo tail -f /var/log/nginx/error.log
# Output: "upstream sent invalid header while reading response header from upstream"

# Check PHP-FPM log
sudo tail -f /var/log/php8.3-fpm.log
# Output: "WordPress database error Table 'wordpress_db.AB_wfconfig' doesn't exist"
Solution: Query all database tables and verify prefix consistency:
SHOW TABLES;
-- Found leftover wp_wfconfig, wp_wfblocks7, etc.

RENAME TABLE wp_wfconfig TO AB_wfconfig;
RENAME TABLE wp_wfblocks7 TO AB_wfblocks7;
-- (total: 39 tables needed renaming)
Lesson: When changing database prefixes, audit ALL tables, not just WordPress core tables. Plugins create their own schema.
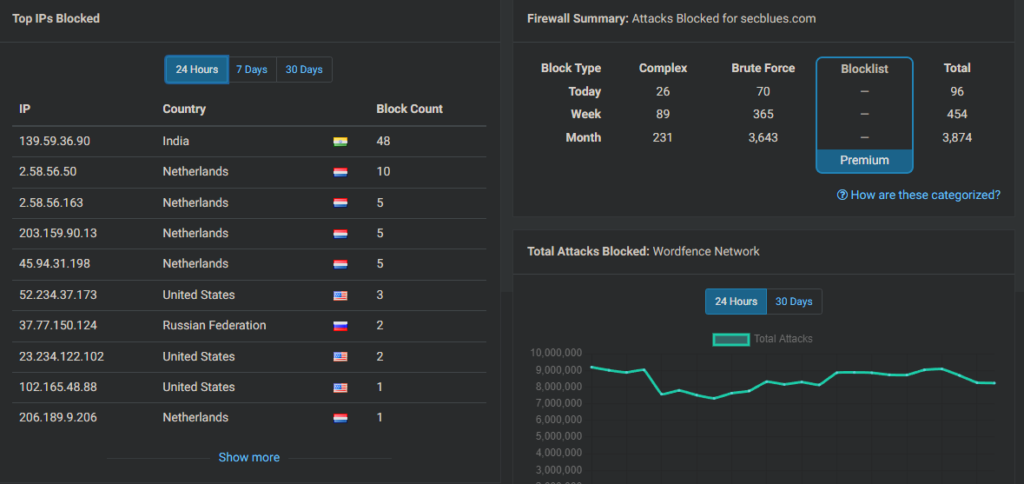
If you’re using Cloudflare in proxy mode (orange cloud), you get an additional security layer in front of your server.
Navigate to: Security → Settings in Cloudflare dashboard
Recommended configuration:
Free plan users get 5 firewall rules. Use them wisely.
Example rule: Block known bad bots
(cf.bot_management.score lt 30)
Action: Block
Example rule: Rate limit wp-login.php
(http.request.uri.path contains "/wp-login.php")
Action: Challenge
Rate: 3 requests per minute
Force HTTPS redirect (free with Cloudflare):
URL: http://*[your_domain].com/*
Setting: Always Use HTTPS
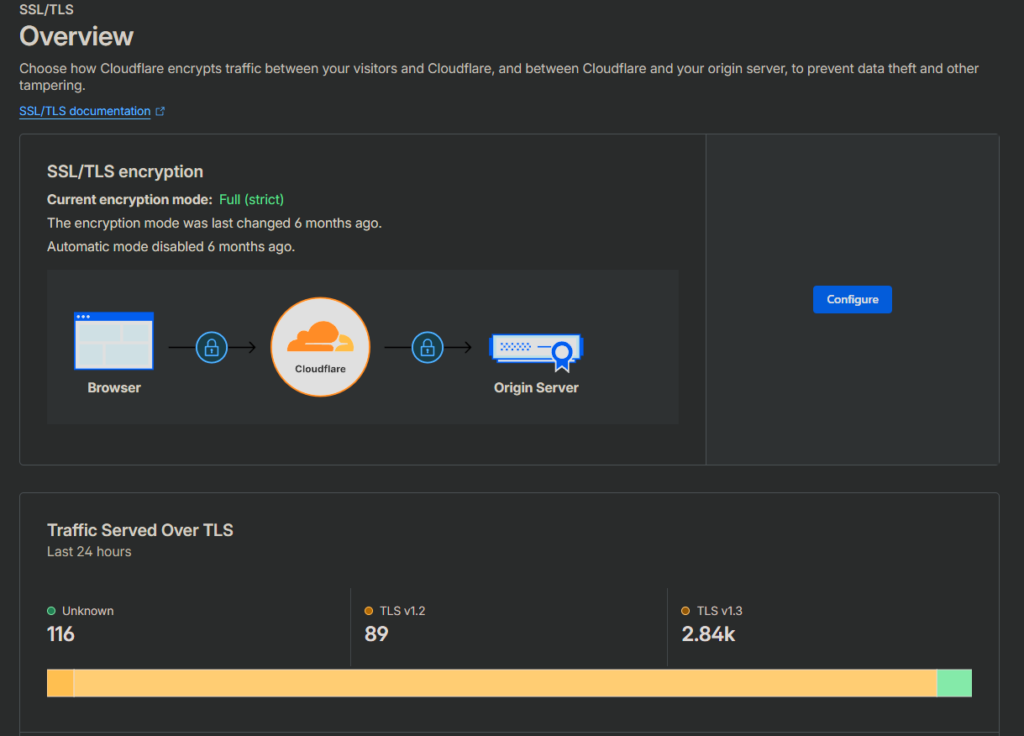
Verify SSL/TLS Strict mode is enabled:
On your server, ensure valid SSL certificate:
# If using Let's Encrypt
sudo certbot renew --dry-run

# Check certificate validity
openssl x509 -in /etc/letsencrypt/live/[your_domain].com/cert.pem -noout -dates
A comprehensive verification list before considering your WordPress installation hardened:
Security is not a destination; it’s a continuous process. This guide covers the foundational hardening measures for a WordPress blog, but the threat landscape evolves constantly.
The three pillars of WordPress security:
Next steps:
Resources:
By following this guide, you’ve transformed a default WordPress installation into a hardened, defense-in-depth security architecture. Each layer—from the OS firewall to Cloudflare’s WAF—adds redundancy. If one layer fails, others remain.
The philosophy: Make your blog a harder target than the next one. Attackers seek easy wins; don’t be one.
Last updated: February 2026
WordPress Version: 6.4+
Server: Ubuntu 24.04 LTS / Nginx