Physical Address
42°26′05″N 83°59′06″W
Physical Address
42°26′05″N 83°59′06″W
Time to complete: 1-2 hours Additional monthly cost: $0 (Roundcube is self-hosted) Prerequisites: Parts 1-3 completed – mail server sending and receiving, SpamAssassin filtering, fail2ban active
Parts 1 through 3 built a functional mail server from scratch — component selection, deployment, outbound relay, spam filtering, and security hardening. What’s missing is the last mile: actually using the thing day to day.
This final article covers:
If you’ve been following along, your server already handles the complete email lifecycle. This article makes it accessible from anywhere and confirms everything is working the way it should be.
A note on the relay: If you followed Part 3 when it was originally published, you may have set up SendGrid as your outbound relay. I’ve since migrated to SMTP2GO after two SendGrid free-tier account lockouts caused by their anti-abuse automation. Part 3 has been updated to reflect this, and everything in this article applies regardless of which relay you’re using. The client configuration is identical — the relay is transparent to everything downstream.
Every email client needs the same four pieces of information:
Incoming (IMAP):
Server:     mail.[your-domain].com
Port:       993
Security:   SSL/TLS
Username:   [your-username]
Password:   [your-password]
Outgoing (SMTP):
Server:     mail.[your-domain].com
Port:       587
Security:   STARTTLS
Auth:       Normal password
Username:   [your-username]
Password:   [your-password]
These settings are the same regardless of client. The server-side configuration from Parts 2 and 3 already handles everything — Dovecot on 993 for IMAP, Postfix submission on 587 for SMTP, both requiring TLS and authentication.
Thunderbird’s auto-detect usually gets the IMAP side right but can stumble on SMTP settings, especially with non-standard relay configurations.
[username]@[your-domain].com), and passwordmail.[your-domain].com, port 993, SSL/TLSmail.[your-domain].com, port 587, STARTTLSIf Thunderbird tries to use port 465 or SSL/TLS for outgoing instead of STARTTLS on 587, it will fail. Port 465 (implicit TLS) isn’t enabled in the master.cf configuration from Part 2 — only the submission service on 587 with STARTTLS is active.
Testing send:
Compose a test email to a Gmail or Outlook address. Check the Sent folder — if the message appears there, Thunderbird successfully authenticated via SASL on port 587 and Postfix relayed it through your outbound provider.
If sending fails with a connection timeout, verify from the server that port 587 is still listening:
sudo ss -tlnp | grep :587
# Should show: LISTEN 0 100 0.0.0.0:587
If it’s listening but Thunderbird can’t connect, check your firewall:
sudo ufw status | grep 587
# Should show: 587/tcp ALLOW IN Anywhere
Common Thunderbird issues:
collin), not the full email address, unless your Dovecot auth is configured for email-based login./etc/postfix/sasl_passwd is correct and the hash was regenerated (sudo postmap /etc/postfix/sasl_passwd). This is the single most common gotcha with Postfix relay configuration — editing the file without running postmap means Postfix is still using the old credentials.
iOS Mail handles self-hosted servers well, which makes it a solid option for mobile access without installing anything extra.
[username]@[your-domain].commail.[your-domain].com[your-username]mail.[your-domain].com[your-username]iOS will negotiate TLS automatically. It uses port 993 for IMAP and typically tries 587 with STARTTLS for SMTP.
If verification fails:
iOS shows a generic “Cannot Verify Server Identity” warning for Let’s Encrypt certificates on some older versions. Tap Continue — this is a trust chain issue with the iOS version, not a certificate problem. The connection is still encrypted.
If it genuinely can’t connect, make sure you’re not on a network that blocks port 993 or 587 (some corporate WiFi does this).
The Gmail app on Android supports third-party IMAP accounts:
K-9 Mail follows a similar flow and tends to handle self-hosted servers with fewer quirks than the Gmail app.
macOS Mail sometimes defaults to checking certificates strictly. If you see certificate warnings, it’s the same Let’s Encrypt trust chain behavior as iOS.
Native email clients (Thunderbird, iOS Mail) are better for daily use. Webmail fills a different role:
Part 1 selected Roundcube for its mature plugin ecosystem, active development, and clean interface.
Roundcube is just a PHP web app that talks IMAP and SMTP to your mail server — it doesn’t need to live on the mail server itself. You have two reasonable options:
On the mail server droplet — simplest setup, everything on one box. Downside: you’re adding a web server and PHP to your mail infrastructure, which increases attack surface.
On a separate machine — a VM, another VPS, or even a Raspberry Pi. Roundcube connects to the mail server over the network using the same ports as any other email client. This keeps your mail server lean.
Both approaches use the same Docker Compose setup. The only difference is whether ROUNDCUBEMAIL_DEFAULT_HOST points to localhost or your mail server’s hostname.
Browser → Roundcube (Apache + PHP)
              → IMAP: mail.[your-domain].com:993
              → SMTP: mail.[your-domain].com:587
That’s it. Roundcube is an email client that runs in a browser. Nothing more complicated than that.
You’ll need Docker and Docker Compose installed. If you don’t have them yet:
# Install Docker (Ubuntu/Debian)
curl -fsSL https://get.docker.com | sh
sudo usermod -aG docker $USER
# Log out and back in for group membership to take effect
Create a directory for Roundcube:
mkdir -p ~/roundcube/{config,data}
cd ~/roundcube
Important: Create the config file before starting the container. If Docker starts and the file doesn’t exist, it will create a directory in its place, and the container will fail with a mount error. If this happens to you, docker compose down, rm -rf config/custom.inc.php, create the actual file, then docker compose up -d.
Create the compose file:
nano docker-compose.yml
services:
  roundcube:
    image: roundcube/roundcubemail:latest-apache
    container_name: roundcube
    restart: unless-stopped
    ports:
      - "8080:80"
    environment:
      - ROUNDCUBEMAIL_DEFAULT_HOST=ssl://mail.[your-domain].com
      - ROUNDCUBEMAIL_DEFAULT_PORT=993
      - ROUNDCUBEMAIL_SMTP_SERVER=tls://mail.[your-domain].com
      - ROUNDCUBEMAIL_SMTP_PORT=587
      - ROUNDCUBEMAIL_UPLOAD_MAX_FILESIZE=25M
      - ROUNDCUBEMAIL_SKIN=elastic
      - ROUNDCUBEMAIL_PLUGINS=archive,zipdownload
      - ROUNDCUBEMAIL_DB_TYPE=sqlite
    volumes:
      - ./data/db:/var/roundcube/db
      - ./data/temp:/tmp/roundcube-temp
      - ./config/custom.inc.php:/var/roundcube/config/custom.inc.php:ro
That’s the entire deployment. The latest-apache image includes Apache and PHP — no separate web server container needed.
If Roundcube runs on the same box as the mail server, change the IMAP/SMTP hosts to localhost:
      - ROUNDCUBEMAIL_DEFAULT_HOST=ssl://localhost
      - ROUNDCUBEMAIL_SMTP_SERVER=tls://localhost
If Roundcube runs on a different machine, use the mail server’s public hostname as shown in the default config above. Make sure the machine running Roundcube can reach your mail server on ports 993 and 587. This is the part that tripped me up — more on that in the firewall section below.
Create the config file for UI preferences. Do this before running docker compose up for the first time:
nano config/custom.inc.php
<?php
// Use Elastic skin (modern, responsive)
$config['skin'] = 'elastic';

// Show email threading
$config['default_list_mode'] = 'threads';

// Preview pane layout
$config['layout'] = 'widescreen';

// Auto-save drafts every 60 seconds
$config['draft_autosave'] = 60;

// Display format
$config['date_format'] = 'Y-m-d';
$config['message_show_email'] = true;

// SMTP identity - lock to authenticated user
$config['smtp_user'] = '%u';
$config['smtp_pass'] = '%p';

// Security
$config['ip_check'] = true;
$config['session_lifetime'] = 30;
$config['password_charset'] = 'UTF-8';
cd ~/roundcube
docker compose up -d
Watch the logs for startup issues:
docker logs roundcube -f
# Look for Apache startup messages and "ready to handle connections"
# Press Ctrl+C to stop watching
Verify it’s running:
curl -s http://localhost:8080 | head -20
# Should return HTML (the Roundcube login page)
If Roundcube runs on a different machine and login times out with “Connection to storage server failed,” the container can’t reach your mail server on ports 993 (IMAP) or 587 (SMTP submission).
The latest-apache container image is stripped down — no ping or nc available. Test connectivity with PHP instead:
docker exec roundcube php -r "var_dump(@fsockopen('ssl://mail.[your-domain].com', 993, \$errno, \$errstr, 10)); echo \$errno . ': ' . \$errstr;"
If that returns bool(false) and 110: Connection timed out, the traffic is being blocked somewhere between Roundcube and the mail server.
Things to check:
sudo ufw status on the mail server.Services_Outbound_Ports) that controlled which ports it could reach on the internet. Ports 993 and 587 weren’t in the list because the VM had never needed them before. Adding them to the alias fixed it immediately.The mail server’s UFW can show everything wide open, and you can still get timeouts if the traffic never leaves your local network. Check outbound firewall rules on the machine running Roundcube, not just inbound rules on the mail server.
http://[your-server-ip]:8080 in your browserOnce logged in, compose a test to your Gmail address. Check:
pass?If all three work, Roundcube is fully functional. The email takes the same path as Thunderbird or iOS Mail — through Postfix’s submission service on port 587, then out via your relay.
Roundcube’s default elastic skin is responsive and reasonably modern. It’s not going to be mistaken for Gmail, but it handles the basics well:
The widescreen layout set in custom.inc.php gives you a three-column view (folders / message list / preview) which is the most comfortable for daily use.
The setup above runs on plain HTTP, which is fine if Roundcube is only accessible on your local network. If you’re exposing it to the internet or just want TLS, you have a few options:
Option A: Reverse proxy (Nginx, Caddy, Traefik)
If you already run a reverse proxy for other services, add Roundcube behind it. Remove the ports section from the compose file and connect it to your proxy’s Docker network instead. Point your proxy at the container on port 80.
For Traefik, replace the ports section with labels:
    labels:
      - "traefik.enable=true"
      - "traefik.http.routers.roundcube.rule=Host(`webmail.[your-domain].local`)"
      - "traefik.http.routers.roundcube.entrypoints=websecure"
      - "traefik.http.routers.roundcube.tls=true"
      - "traefik.http.services.roundcube.loadbalancer.server.port=80"
    networks:
      - web

networks:
  web:
    external: true
Make sure the network name matches whatever your Traefik setup actually uses. Run docker network ls to check — it might be web, traefik, traefik_default, or something else entirely depending on how you set it up.
For Caddy, a two-line Caddyfile handles it:
webmail.[your-domain].com {
    reverse_proxy roundcube:80
}
Option B: Cloudflare Tunnel
If Roundcube runs at home and you don’t want to open ports, a Cloudflare Tunnel can expose it securely. Cloudflare handles TLS termination and you get a public URL without touching your firewall.
Option C: Self-signed cert for local use
If it’s strictly internal, a self-signed cert and a quick Nginx config in front of Roundcube works. You’ll get browser warnings but the traffic will be encrypted on your LAN.
For most people following this guide, plain HTTP on a local network is fine to start with. You can add TLS later without changing anything about Roundcube itself.
If the elastic skin doesn’t cut it for you:
Roundcube community plugins can be added via the ROUNDCUBEMAIL_PLUGINS environment variable or mounted into the plugins directory. Check the Roundcube plugin repository for UI enhancements.
Snappymail is a completely separate webmail client (not a Roundcube skin) with a more modern interface. If you find yourself spending more time fighting Roundcube’s UI than reading email, it’s worth evaluating as a replacement. The Docker deployment is similar, and it talks to the same IMAP/SMTP backend.
Before calling this project done, run through the full verification to confirm everything is actually working end to end.
# From any machine:
dig TXT [your-domain].com +short
You should see:
"v=spf1 ip4:[your-droplet-ip] include:spf.smtp2go.com include:amazonses.com -all"
If you’re still on SendGrid, the include will be sendgrid.net instead. Either way, the include:amazonses.com is there for when SES gets approved. It doesn’t hurt anything in the meantime, and you won’t have to touch DNS again when you switch relays.
Send an email to a Gmail address, then open it in Gmail:
Authentication-Results: mx.google.com;
    dkim=pass header.d=[your-domain].com
    spf=pass (google.com: domain of [username]@[your-domain].com designates...)
    dmarc=pass (p=NONE sp=NONE dis=NONE)
All three should show pass.
If DKIM shows fail or none, your relay’s domain authentication may not be complete. For SMTP2GO, check the CNAME records:
# Verify SMTP2GO CNAME records exist
dig CNAME em[your-id].[your-domain].com +short
dig CNAME s[your-id]._domainkey.[your-domain].com +short
# Should return smtp2go.net addresses
For SendGrid, the records are s1._domainkey and s2._domainkey pointing to sendgrid.net.
Part 2 set DMARC to p=none (monitoring only). This was deliberate — you want to see reports before enforcing a policy.
Check your current record:
dig TXT _dmarc.[your-domain].com +short
# Should show: "v=DMARC1; p=none; rua=mailto:dmarc@[your-domain].com"
The upgrade schedule:
After 30 days of clean DMARC reports (no legitimate mail failing authentication):
v=DMARC1; p=quarantine; rua=mailto:dmarc@[your-domain].com; pct=100
After 60 days with no issues:
v=DMARC1; p=reject; rua=mailto:dmarc@[your-domain].com; pct=100
p=reject is the end goal — it tells receiving servers to outright reject mail that fails SPF and DKIM. This prevents anyone from spoofing your domain.
Don’t rush to p=reject. If something is misconfigured, you’ll silently lose legitimate email. The monitoring period exists for a reason.
Reading DMARC reports:
The rua address receives XML aggregate reports from providers like Gmail and Outlook. They’re not fun to read raw. Tools like DMARC Analyzer or dmarcian can parse them into something readable.
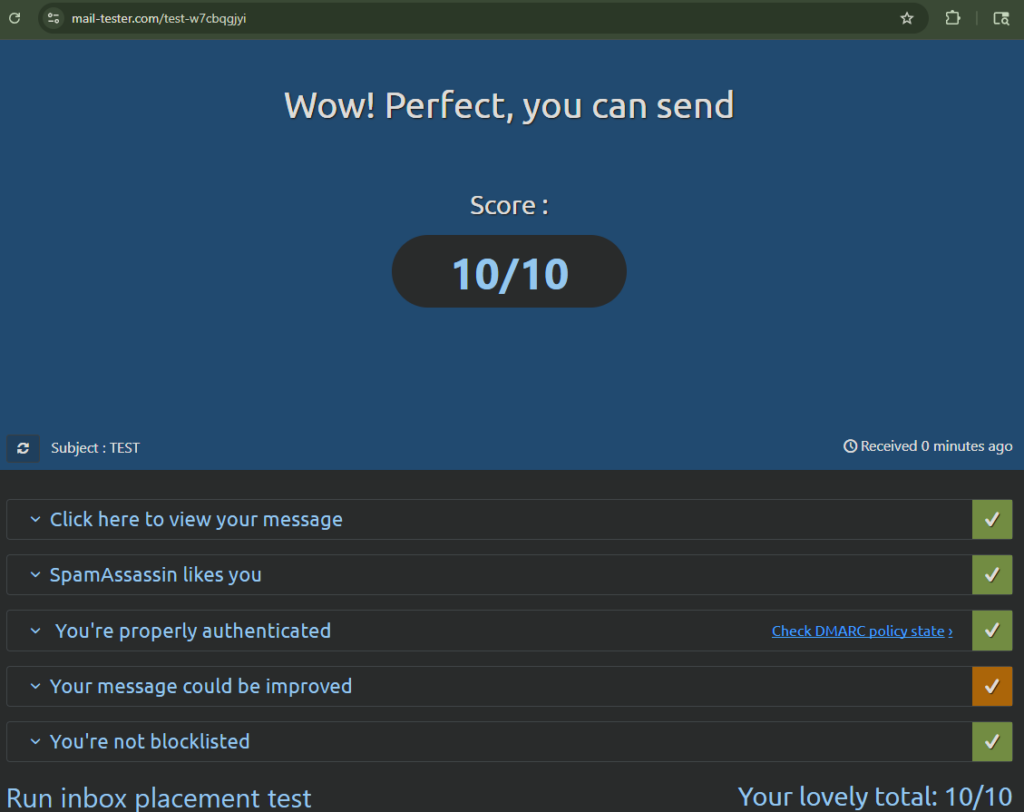
mail-tester.com gives you a comprehensive score for your outbound email configuration:
A score of 9/10 or higher means your configuration is solid. Common deductions:
Test the full path from each client:
From Thunderbird:
From iOS/Android:
From Roundcube:
If all three paths work with passing authentication headers, the mail server is fully operational.
Confirm your server isn’t an open relay (this was checked in Part 3, but worth verifying again):
telnet mail.[your-domain].com 25
# After connecting:
EHLO test.com
MAIL FROM:<[email protected]>
RCPT TO:<[email protected]>
You should get:
554 5.7.1 <[email protected]>: Relay access denied
If it says 250 OK, your server is an open relay and will be blacklisted within hours. Go back to Part 2 and check smtpd_recipient_restrictions in main.cf.
Over four articles, from bare metal to production:
Infrastructure:
DNS and Authentication:
Client Access:
| Service | Monthly Cost |
|---|---|
| DigitalOcean mail droplet | $6.00 |
| DigitalOcean WordPress droplet (existing) | $6.00 |
| AWS S3 backups | ~$0.50 |
| SMTP2GO relay | $0.00 (free tier) |
| Roundcube | $0.00 (self-hosted) |
| Total | ~$12.50/month |
The incremental cost over the existing WordPress hosting is $6.50/month for a fully self-hosted email server with professional deliverability.
For comparison:
This project has been through three relay providers, which honestly taught more than getting it right the first time would have.
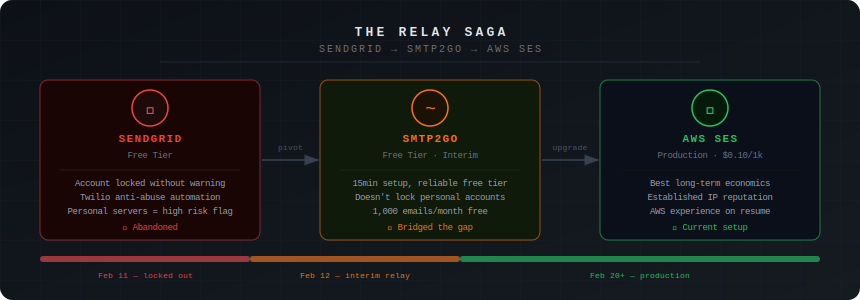
Attempt 1: AWS SES. The original plan. Denied production access because the account was new with no billing history. The response was clear: build up usage of other AWS services over 2-3 billing cycles, then reapply.
Attempt 2: SendGrid. Pivoted here as the backup plan. Worked great initially. Then the first free-tier account got locked by their anti-abuse automation — no warning, no appeal that went anywhere. Created a second account. That got locked too, within weeks. Two accounts, same pattern: low-volume personal email flagged as suspicious by automated systems with no meaningful human review.
Attempt 3: SMTP2GO. The migration took about 15 minutes — new CNAME records in Cloudflare, updated credentials in /etc/postfix/sasl_passwd, postmap, restart. Working ever since with no issues. The free tier gives 1,000 emails/month, which is more than enough for personal use.
The takeaway: free tiers on high-volume commercial platforms aren’t designed for low-volume personal senders. You’re an edge case in their abuse detection models. SMTP2GO’s free tier is genuinely usable for this purpose. And if it weren’t, the two-line relay swap means you’re never locked into anything.
When SES eventually gets approved, the migration is two commands:
# Update relay credentials
sudo nano /etc/postfix/sasl_passwd
# Change: [mail.smtp2go.com]:2525 user:password
# To:     [email-smtp.us-east-2.amazonaws.com]:587 AKIA...:secretkey

sudo postmap /etc/postfix/sasl_passwd

# Update relay host
sudo nano /etc/postfix/main.cf
# Change: relayhost = [mail.smtp2go.com]:2525
# To:     relayhost = [email-smtp.us-east-2.amazonaws.com]:587

sudo systemctl restart postfix
No DNS changes, no client reconfiguration. The relay is transparent to everything upstream. The S3 backup system from Part 2 generates consistent AWS billing (~$0.50/month), and after 60-90 days of that, the SES reapplication should have a better chance.
Documenting only the successes would be dishonest. Here’s what the series ran into:
SendGrid free tier lockouts: The biggest surprise and the reason Part 3 got updated mid-series. Two accounts locked by anti-abuse automation, both for normal personal email volume. If you go with SendGrid, use a paid plan or be prepared to pivot.
DigitalOcean port 587 blocking: New droplets can’t send on port 587 outbound. This is an anti-spam measure that’s nowhere in the obvious documentation. Both SendGrid and SMTP2GO support port 2525 as an alternative. If you’re on a different VPS provider, check whether they block outbound SMTP ports before you start.
SpamAssassin mail loop: The content filter integration between Postfix and SpamAssassin creates a loop if the port 10025 off-ramp isn’t configured with an empty content_filter=. This is a known gotcha, but it’s the kind of thing that causes a 30-minute debugging session the first time you hit it.
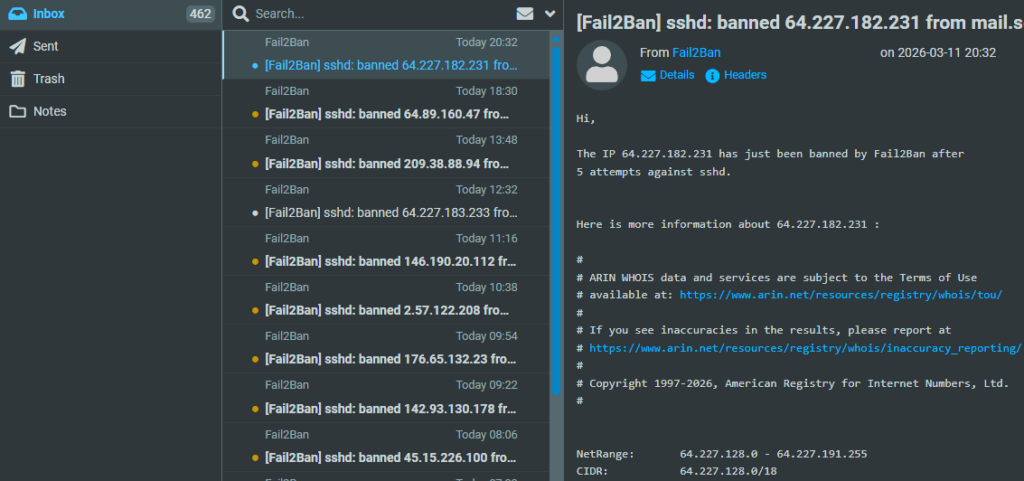
fail2ban Dovecot filter: The default regex filter for Dovecot on Ubuntu 24.04 has compatibility issues. Rather than spending time debugging filter patterns, SSH and Postfix SASL protection covers the critical attack vectors.
SendGrid signup rejection: Using a privacy-focused email provider (ProtonMail, Tutanota) to sign up for SendGrid results in silent rejection. Gmail or Outlook addresses work instantly. Makes sense from their anti-abuse perspective, but it’s not documented.
Stale Postfix hash files: Editing /etc/postfix/sasl_passwd without running sudo postmap /etc/postfix/sasl_passwd afterward means Postfix keeps using the old credentials from the .db file. This bit me during the SMTP2GO migration. The fix is always the same: edit the file, run postmap, restart Postfix.
master.cf typo: permit_sasl_authenticated is correct. permit_sasl_authentication (without the ‘d’) is not a real Postfix option and silently does nothing. Fun to debug.
Docker volume mount directory bug: If you start a Docker container before creating a file that’s bind-mounted in the compose file, Docker helpfully creates a directory at that path instead of waiting. The container then fails with a mount error about “not a directory.” The fix: docker compose down, delete the directory, create the actual file, then docker compose up -d.
Roundcube firewall timeout (homelab-specific): If Roundcube runs on a homelab VM behind a firewall like OPNsense, the VM’s outbound port restrictions might not include 993 (IMAP) and 587 (SMTP). The mail server’s UFW can be wide open and you’ll still get connection timeouts if the traffic never leaves your local network. Check outbound rules on the Roundcube host, not just inbound rules on the mail server.
This is the part that matters for a cybersecurity career. Running a mail server teaches you:
Email authentication protocols: SPF, DKIM, and DMARC aren’t abstract concepts anymore. You’ve configured them, tested them, and seen what happens when they fail. Understanding these protocols is directly relevant to phishing analysis, email forensics, and security architecture.
DNS at a practical level: MX records, CNAME chains, PTR records, TXT records with specific syntax requirements. DNS misconfiguration is behind a significant percentage of email deliverability issues, and understanding DNS deeply is foundational for security work.
Linux service administration: Postfix, Dovecot, SpamAssassin, fail2ban — each with its own configuration format, logging approach, and failure modes. The troubleshooting skills transfer to any Linux service management role.
Multi-cloud architecture: DigitalOcean for compute, AWS for storage and (eventually) email relay, Cloudflare for DNS and CDN, SMTP2GO for relay. Understanding how to integrate services across providers is increasingly relevant.
Log analysis and troubleshooting: journalctl, postfix check, doveconf -n, reading raw email headers — these are the tools you use when something breaks at 2 AM. The debugging process is more valuable than the working configuration.
Security hardening: TLS configuration, firewall rules, fail2ban, SASL authentication, relay restrictions. Each layer serves a specific purpose, and understanding why each control exists matters more than the implementation details.
Incident response (unplanned): The SendGrid lockouts were essentially a service disruption that required rapid diagnosis and migration to an alternative provider. That’s incident response in miniature — identify the impact, find the alternative, execute the migration, verify the fix, update the documentation. Not a bad skill to practice on a personal project rather than in production at 3 AM.
For anyone who wants to keep building on this:
Configuration:
  /etc/postfix/main.cf          - Postfix main config
  /etc/postfix/master.cf        - Postfix service definitions
  /etc/postfix/sasl_passwd      - SMTP relay credentials
  /etc/dovecot/conf.d/          - Dovecot configuration files
  /etc/spamassassin/local.cf    - SpamAssassin rules
  /etc/fail2ban/jail.local      - fail2ban jail config

Certificates:
  /etc/letsencrypt/live/mail.[your-domain].com/

Mail Storage:
  /home/[username]/Maildir/     - User mailboxes

Logs:
  sudo journalctl -u postfix    - Postfix logs
  sudo journalctl -u dovecot    - Dovecot logs
  sudo journalctl -u spamassassin
  sudo fail2ban-client status   - Ban statistics

Backups:
  /usr/local/bin/backup-mail.sh - Backup script
  /var/log/mail-backup.log      - Backup logs
  S3: [your-domain]-mail-backups-[timestamp]/

Monitoring:
  /usr/local/bin/check-disk-space.sh
  /usr/local/bin/check-cert-expiry.sh
# Service management
sudo systemctl restart postfix dovecot spamassassin fail2ban
sudo systemctl status postfix dovecot spamassassin fail2ban

# Mail queue
sudo mailq                      # View queue
sudo postsuper -d ALL           # Clear queue (nuclear option)

# Testing
sudo postfix check              # Configuration validation
sudo doveconf -n                # Dovecot effective config
openssl s_client -connect mail.[your-domain].com:993 -quiet  # Test IMAP TLS

# Relay credentials (always run postmap after editing sasl_passwd)
sudo nano /etc/postfix/sasl_passwd
sudo postmap /etc/postfix/sasl_passwd
sudo systemctl restart postfix

# Monitoring
sudo fail2ban-client status sshd
sudo fail2ban-client status postfix-sasl
aws s3 ls s3://[your-bucket]/ --recursive --human-readable | tail -5
This series started with a question: is self-hosting email in 2026 worth the effort?
The answer depends on what you’re trying to get out of it. If you just need email, buy Fastmail and move on. If you want to understand how one of the internet’s most fundamental protocols actually works — how messages get routed, authenticated, filtered, and delivered — there’s no substitute for building it yourself.
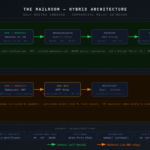
The hybrid approach (self-hosted server with commercial relay) reflects a real engineering tradeoff. IP reputation is a genuine infrastructure problem that takes months to solve organically. Using a relay service for outbound delivery isn’t a compromise — it’s the same architecture that production mail systems use at scale. The difference is you understand every component in the chain.
The relay journey from SES denial to SendGrid lockouts to SMTP2GO stability wasn’t in the original plan, but it ended up demonstrating something important: when you understand your own infrastructure, migrating between providers is a 15-minute job, not a crisis. That portability — knowing exactly what each component does and how to swap it — is the actual value of building this yourself.
Four articles. About 8-10 hours of hands-on work. $6.50/month incremental cost. One fully functional mail server that you can troubleshoot, extend, and explain in a job interview.
This is Part 4 of “The Mailroom” email server series.
Published: [Date] Last updated: [Date] Time to complete: 1-2 hours Part of series: Building a Secure Email Server Previous: Part 3 – Outbound Mail and Security Hardening