Physical Address
42°26′05″N 83°59′06″W
Physical Address
42°26′05″N 83°59′06″W
Time to complete: 2-3 hours
Additional monthly cost: $0 (SMTP2GO free tier)
Prerequisites: Parts 1 & 2 completed – mail server receiving email, IMAP working, S3 backups running
In Part 2 we built a mail server that receives email reliably. This article completes the stack: outbound email via SMTP2GO relay, spam filtering with SpamAssassin, brute-force protection with fail2ban, and lightweight monitoring.
What you’ll have by the end:
Fair warning: this section has more moving parts than Part 2 and more places where things can go sideways. We’ll document the real issues encountered so you can skip the troubleshooting rabbit holes.
This section documents the original SendGrid setup, which worked — until it didn’t. Two separate SendGrid accounts were locked without explanation during this project. The first account (registered with a domain email) was locked within weeks. The second (registered with Gmail, following their own advice) lasted slightly longer before the same thing happened.
SendGrid’s anti-abuse automation is designed to catch spammers at scale, but it has a high false-positive rate for legitimate low-volume senders. New accounts with no billing history sending 5-10 emails per day match the same pattern as spammers testing stolen credentials — and there’s no reliable way to prevent it on the free tier.
The setup below was migrated to SMTP2GO, which has a 1,000 emails/month free tier and hasn’t shown the same lockout behavior. The Postfix configuration is nearly identical — only the relay hostname and credentials change. If you’re following along, skip to the SMTP2GO configuration below. The SendGrid walkthrough is preserved for reference since the DNS and Postfix concepts apply to any relay provider.
AWS SES denied production access for our new account (covered in Part 2). SendGrid’s free tier gives 100 emails/day with no waiting period. That’s enough for professional correspondence and projects while we build AWS billing history for eventual SES approval.
Free tier limits:
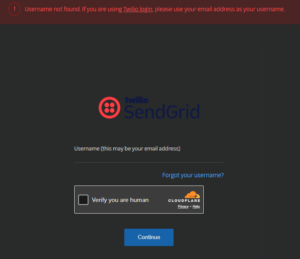
Critical: Use a Gmail or Outlook address to sign up – not ProtonMail, Tutanota, or other privacy-focused providers. SendGrid’s automated fraud detection flags privacy email providers and will reject your account outright without explanation. This is a silent failure – you won’t know why you were rejected.
If you get rejected:
SendGrid needs to verify you own your domain before allowing you to send from it.
[your-domain].comYou’ll see 5-6 DNS records to add. The table shows “Host” and “Value” columns. Example:
Type: CNAME  Host: url6981.[your-domain].com      Value: sendgrid.net
Type: CNAME  Host: 59853756.[your-domain].com     Value: sendgrid.net
Type: CNAME  Host: em8538.[your-domain].com        Value: u59853756.wl007.sendgrid.net
Type: CNAME  Host: s1._domainkey.[your-domain].com Value: s1.domainkey.u59853756.wl007.sendgrid.net
Type: CNAME  Host: s2._domainkey.[your-domain].com Value: s2.domainkey.u59853756.wl007.sendgrid.net
Type: TXT    Host: _dmarc.[your-domain].com        Value: v=DMARC1; p=none; rua=...
Your numbers will differ – copy them exactly from SendGrid.
Go to Cloudflare → DNS → Add record.
Important: In the “Name” field, enter only the subdomain portion – not the full hostname. Cloudflare automatically appends your domain.
For example, if SendGrid shows url6981.[your-domain].com:
url6981 ✅url6981.[your-domain].com ❌ (creates double domain)Add each CNAME record with Proxy status: DNS only (gray cloud).
Skip the DMARC TXT record if you already have one from Part 2. You can’t have duplicate DMARC records.
After adding all records, click Verify in SendGrid. DNS propagation takes 2-10 minutes.
Update your SPF record in Cloudflare to authorize SendGrid:
Find your existing SPF TXT record (the one starting with v=spf1) and edit it to add include:sendgrid.net:
v=spf1 ip4:[your-droplet-ip] include:sendgrid.net include:amazonses.com -all
mail-server-smtp-relayCopy the API key immediately (starts with SG.). You cannot view it again.
Create the SASL credentials file:
sudo nano /etc/postfix/sasl_passwd
Add this line (replace with your actual API key):
[smtp.sendgrid.net]:2525 apikey:SG.your-actual-api-key-here
Note the port: 2525, not 587.
DigitalOcean blocks outbound port 587 on new droplets to prevent spam. SendGrid also listens on port 2525 which is not blocked.
Verify the connection works before proceeding:
telnet smtp.sendgrid.net 2525
# Should show: 220 SG ESMTP service ready
# Press Ctrl+] then type quit to exit
If port 2525 connects and 587 times out, you’ve confirmed the block. Use 2525.
Save and exit the sasl_passwd file.
Secure the file and create hash database:
sudo chmod 600 /etc/postfix/sasl_passwd
sudo postmap /etc/postfix/sasl_passwd

# Verify both files exist
ls -la /etc/postfix/sasl_passwd*
Update Postfix main.cf:
sudo nano /etc/postfix/main.cf
At the end of the file, add:
# ====== SendGrid SMTP Relay ======
relayhost = [smtp.sendgrid.net]:2525
smtp_sasl_auth_enable = yes
smtp_sasl_password_maps = hash:/etc/postfix/sasl_passwd
smtp_sasl_security_options = noanonymous
smtp_sasl_tls_security_options = noanonymous
smtp_tls_security_level = encrypt
header_size_limit = 4096000

# SpamAssassin concurrency limits
spamassassin_destination_concurrency_limit = 1
spamassassin_destination_recipient_limit = 1
Check for duplicate settings:
sudo postfix check
If you see warnings about “overriding earlier entry” for relayhost or smtp_tls_security_level, there are duplicate lines from Part 2’s configuration. Comment out the old ones:
# Find and comment out the old empty relayhost line
sudo grep -n "^relayhost" /etc/postfix/main.cf
A critical note on smtpd_* vs smtp_*:
These look nearly identical but do completely different things:
smtpd_* (with ‘d’) = Server settings – controls connections into your server (email clients connecting on port 587)smtp_* (no ‘d’) = Client settings – controls connections out of your server (to SendGrid)You need both sets. The SendGrid section uses smtp_* for outbound. Your existing smtpd_* settings from Part 2 handle inbound submission. Don’t comment out the smtpd_* lines.
Save and restart Postfix:
sudo postfix check
sudo systemctl restart postfix
sudo systemctl status postfix
# Send test using sendmail directly
/usr/sbin/sendmail [email protected] << EOF
Subject: Test from mail server
From: root@[your-domain].com

Testing SendGrid relay on port 2525
EOF
Check the mail queue:
sudo mailq
If the queue is empty immediately, the mail either delivered or failed fast. Check logs:
sudo journalctl -u postfix --since "2 minutes ago" --no-pager | grep -E "status=|relay="
Successful delivery looks like:
relay=smtp.sendgrid.net[IP]:2525, status=sent (250 Ok: queued as ABC123)
Also verify in SendGrid:
Go to SendGrid → Activity → You should see your sent message listed as “Delivered”.
Delivery reports from failed attempts will appear in /root/Maildir/new/. If you see files there, read them:
sudo cat /root/Maildir/new/* | grep -E "status=|Final-Recipient|Diagnostic" | tail -20
Common issue – queue stuck with port 587 errors:
If you see connect to smtp.sendgrid.net:587: Connection timed out, you edited sasl_passwd but forgot to regenerate the hash:
sudo postmap /etc/postfix/sasl_passwd
sudo postsuper -d ALL  # Clear stuck queue
sudo systemctl restart postfix
After two SendGrid lockouts, the requirements shifted from “best free tier” to “free tier that won’t randomly revoke access.”
SMTP2GO free tier:
[your-domain].comIf migrating from SendGrid: Delete the old SendGrid CNAME records first (url6981, 59853756, em8538, s1._domainkey, s2._domainkey). Keep any SES DKIM records if you’re still planning that migration.
Add the SMTP2GO records:
| Type | Name | Target |
|---|---|---|
| CNAME | em[your-number] | return.smtp2go.net |
| CNAME | s[your-number]._domainkey | dkim.smtp2go.net |
| CNAME | link | track.smtp2go.net |
Your numbers will differ — copy them exactly from SMTP2GO.
Update your SPF record to replace sendgrid.net with smtp2go.com:
v=spf1 ip4:[your-droplet-ip] include:smtp2go.com include:amazonses.com -allUpdate the SASL credentials file:
sudo nano /etc/postfix/sasl_passwdReplace the SendGrid line with:
[mail.smtp2go.com]:2525 your-smtp2go-username:your-smtp2go-passwordCritical step most people miss: Regenerate the hash database. Postfix reads the .db file, not the text file. If you edit sasl_passwd without running postmap, Postfix will keep using the old credentials.
sudo chmod 600 /etc/postfix/sasl_passwd
sudo postmap /etc/postfix/sasl_passwd
Update main.cf:
sudo nano /etc/postfix/main.cfChange the relayhost line:
relayhost = [mail.smtp2go.com]:2525The rest of the SASL settings from the SendGrid section remain the same — smtp_sasl_auth_enable, smtp_sasl_password_maps, smtp_sasl_security_options, and smtp_tls_security_level don’t change.
Restart and test:
sudo postfix check
sudo systemctl restart postfix
echo "SMTP2GO relay test" | /usr/sbin/sendmail -v [email protected]
Check the logs:
sudo journalctl -u postfix --since "2 minutes ago" --no-pager | grep -E "status=|relay="Successful delivery looks like:
relay=mail.smtp2go.com[45.79.170.99]:2525, status=sent (250 OK)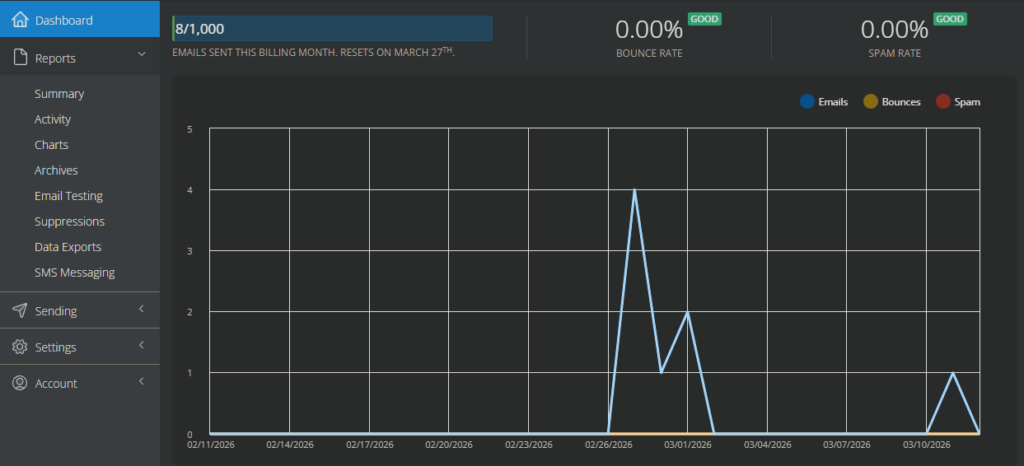
SpamAssassin filters incoming spam using rule-based scoring and Bayesian analysis. Getting it integrated with Postfix correctly requires some care – there’s a specific mail loop issue to avoid.
sudo apt install spamassassin spamc -y

# Verify installation
spamassassin --version
Find the correct spamd binary path – this varies between systems and getting it wrong prevents the service from starting:
which spamd
# Usually: /usr/sbin/spamd
Create SpamAssassin system user:
sudo adduser --system --group --no-create-home spamd
sudo nano /etc/spamassassin/local.cf
Add:
# Spam score threshold (5.0 is standard)
required_score 5.0

# Bayesian filtering
use_bayes 1
bayes_auto_learn 1

# Network checks
skip_rbl_checks 0

# Mark spam in subject line
rewrite_header Subject [SPAM]

# Don't modify spam (just add headers)
report_safe 0
Save and exit.
Enable SpamAssassin daemon:
sudo nano /etc/default/spamassassin
Find and change:
ENABLED=0  →  ENABLED=1
CRON=0     →  CRON=1
Save and exit.
This is where most problems occur. The integration requires careful configuration to avoid a mail loop where Postfix sends mail to SpamAssassin, which sends it back to Postfix, which sends it back to SpamAssassin indefinitely.
The correct architecture:
Internet → Postfix (port 25) → SpamAssassin (port 783)
                                      ↓
              Your Maildir ← Postfix (port 10025)
Port 10025 is a dedicated “off-ramp” that receives mail back from SpamAssassin with content filtering disabled.
Edit master.cf:
sudo nano /etc/postfix/master.cf
Step 1: Add content filter to the smtp service (around line 17):
Find the smtp service line:
smtp inet n - y - - smtpd
Add the content_filter option below it:
smtp      inet  n       -       y       -       -       smtpd
  -o content_filter=spamassassin:127.0.0.1:10025
Step 2: Add the port 10025 off-ramp (add this block, before the spamassassin pipe):
# SpamAssassin return path - content filtering disabled
127.0.0.1:10025 inet  n       -       n       -       10      smtpd
  -o content_filter=
  -o receive_override_options=no_unknown_recipient_checks,no_header_body_checks,no_milters
  -o smtpd_helo_restrictions=
  -o smtpd_client_restrictions=
  -o smtpd_sender_restrictions=
  -o smtpd_recipient_restrictions=permit_mynetworks,reject
  -o mynetworks=127.0.0.0/8
  -o smtpd_authorized_xforward_hosts=127.0.0.0/8
Step 3: Add the SpamAssassin pipe (at the end of the file):
# SpamAssassin filter pipe
spamassassin unix -     n       n       -       -       pipe
  user=spamd argv=/usr/sbin/spamc -f -e /usr/sbin/sendmail -oi -f ${sender} ${recipient}
Important: The path is /usr/sbin/spamc – verify this matches your system with which spamc. Getting this wrong causes the spamd service to fail with a path error.
Do not add localhost:10025 to the argv line. Postfix will interpret it as a recipient email address and try to deliver mail to a user named “localhost:10025”, causing bounce messages.
Save and exit.
Start SpamAssassin and restart Postfix:
sudo systemctl start spamassassin
sudo systemctl enable spamassassin
sudo systemctl status spamassassin

sudo systemctl restart postfix
sudo systemctl status postfix
If spamassassin fails to start:
# Check logs for exact error
sudo journalctl -u spamassassin -n 50 --no-pager

# Verify spamd path
which spamd
ls -la /usr/sbin/spamd

# If the service file has wrong path, fix it
sudo systemctl edit --full spamassassin
# Find ExecStart= line and correct the path
Check that mail is being scanned:
Send an email from an external account to your mail server, then check the headers of the received email in Thunderbird:
Right-click the email → View Source (or Message Source)
Look for:
X-Spam-Checker-Version: SpamAssassin 4.0.0 on mail.[your-domain].com
X-Spam-Status: No, score=-0.0 required=5.0
If you see these headers, SpamAssassin is scanning mail.
Test with GTUBE spam pattern:
Send an email from an external address to your server with this exact text in the body:
XJS*C4JDBQADN1.NSBN3*2IDNEN*GTUBE-STANDARD-ANTI-UBE-TEST-EMAIL*C.34X
SpamAssassin will score this 1000+ (well above the 5.0 threshold). Check that the email arrives with [SPAM] in the subject line.
If mail stops flowing after SpamAssassin integration:
The most common issue is a mail loop. Check the logs:
sudo journalctl -u postfix --since "5 minutes ago" --no-pager | grep -E "too many hops|loop"
If you see “too many hops” errors, the off-ramp on port 10025 isn’t working correctly. Verify:
127.0.0.1:10025 block exists in master.cf with content_filter= (empty value)Clear any stuck mail and restart:
sudo postsuper -d ALL
sudo systemctl restart postfix

fail2ban monitors logs and automatically bans IPs that show malicious behavior – failed login attempts, brute-force attacks, and so on.
sudo apt install fail2ban -y
Do not edit /etc/fail2ban/jail.conf – it gets overwritten on package updates. Create a local override:
sudo nano /etc/fail2ban/jail.local
Paste:
[DEFAULT]
bantime = 3600
findtime = 600
maxretry = 5
[sshd]
enabled = true
[postfix-sasl]
enabled = true
What this does:
Save and exit.
A note on the Dovecot jail:
The default Dovecot filter that ships with fail2ban on Ubuntu 24.04 has regex compatibility issues that cause fail2ban to crash on startup. Don’t enable the Dovecot jail without first verifying the filter works on your system.
SSH and Postfix protection cover the most critical attack vectors. Dovecot authentication failures will often be caught by the Postfix jail anyway since they share the same authentication path.
If you want to attempt Dovecot protection later:
# Test if the filter is valid before enabling
sudo fail2ban-client -t
Only add [dovecot] with enabled = true if the configuration test passes cleanly.
Start fail2ban:
sudo systemctl restart fail2ban
sudo systemctl enable fail2ban
sudo systemctl status fail2ban
Verify jails are active:
sudo fail2ban-client status
Expected output:
Status
|- Number of jail:      2
`- Jail list:   postfix-sasl, sshd
Check each jail:
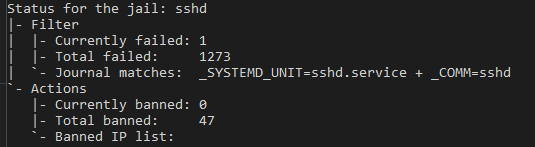
sudo fail2ban-client status sshd
sudo fail2ban-client status postfix-sasl
You’ll likely already see failed attempts in the SSH jail – internet scanners constantly probe SSH on all IP addresses. If any IP has exceeded the threshold, it will appear in the “Banned IP list”.
Useful fail2ban commands:
# Unban an IP (if you accidentally ban yourself)
sudo fail2ban-client set sshd unbanip [your-ip]

# View fail2ban logs
sudo tail -f /var/log/fail2ban.log

# Check currently banned IPs
sudo fail2ban-client status sshd | grep "Banned IP"
For a personal mail server, you want exception-based monitoring – alerts only when something is broken, not daily status reports. Two things warrant automated alerts:
Daily summary emails and fail2ban notifications are mostly noise at this scale.
sudo nano /usr/local/bin/check-disk-space.sh
Paste:
#!/bin/bash

THRESHOLD=85
USAGE=$(df / | tail -1 | awk '{print $5}' | sed 's/%//')
HOSTNAME=$(hostname)

if [ $USAGE -gt $THRESHOLD ]; then
    echo "Disk usage on ${HOSTNAME} is at ${USAGE}%.

Breakdown:
$(df -h /)

Maildir size:
$(du -sh /home/*/Maildir 2>/dev/null)

Top 5 largest directories:
$(du -sh /* 2>/dev/null | sort -rh | head -5)" | \
    mail -s "ALERT: Disk Space ${USAGE}% on ${HOSTNAME}" [your-username]@[your-domain].com
fi
Save, exit, make executable:
sudo chmod +x /usr/local/bin/check-disk-space.sh
Test it:
# Temporarily lower threshold to trigger the alert
sudo sed 's/THRESHOLD=85/THRESHOLD=1/' /usr/local/bin/check-disk-space.sh | sudo bash
You should receive an email within 1-2 minutes.
sudo nano /usr/local/bin/check-cert-expiry.sh
Paste:
#!/bin/bash

CERT="/etc/letsencrypt/live/mail.[your-domain].com/cert.pem"
WARN_DAYS=30
HOSTNAME=$(hostname)

EXPIRY=$(openssl x509 -enddate -noout -in $CERT | cut -d= -f2)
EXPIRY_EPOCH=$(date -d "$EXPIRY" +%s)
NOW_EPOCH=$(date +%s)
DAYS_LEFT=$(( ($EXPIRY_EPOCH - $NOW_EPOCH) / 86400 ))

if [ $DAYS_LEFT -lt $WARN_DAYS ]; then
    echo "TLS certificate for ${HOSTNAME} expires in ${DAYS_LEFT} days.

Expiry date: ${EXPIRY}
Certificate: ${CERT}

Run 'sudo certbot renew' to renew manually, or check auto-renewal:
sudo systemctl status certbot.timer
sudo journalctl -u certbot -n 50" | \
    mail -s "ALERT: Certificate expires in ${DAYS_LEFT} days on ${HOSTNAME}" [your-username]@[your-domain].com
fi
Save, exit, make executable:
sudo chmod +x /usr/local/bin/check-cert-expiry.sh
Test it:
# Temporarily set threshold to 999 days to trigger the alert
sudo sed 's/WARN_DAYS=30/WARN_DAYS=999/' /usr/local/bin/check-cert-expiry.sh | sudo bash
Check how many days remain on your actual certificate:
openssl x509 -enddate -noout -in /etc/letsencrypt/live/mail.[your-domain].com/cert.pem
While you’re at it, add failure notification to your backup script from Part 2:
sudo nano /usr/local/bin/backup-mail.sh
Add at the very end of the script:
if [ $? -ne 0 ]; then
    echo "Mail backup failed at $(date). Check the server." | \
    mail -s "ALERT: Backup Failed on $(hostname)" [your-username]@[your-domain].com
fi
sudo crontab -e
Add these lines (alongside the backup job from Part 2):
# Daily mail backup at 2 AM (from Part 2)
0 2 * * * /usr/local/bin/backup-mail.sh >> /var/log/mail-backup.log 2>&1

# Check disk space every 6 hours
0 */6 * * * /usr/local/bin/check-disk-space.sh

# Check certificate expiry every Monday at 8 AM
0 8 * * 1 /usr/local/bin/check-cert-expiry.sh
Save and verify:
sudo crontab -l

All ports listening:
sudo ss -tlnp | grep -E ':(25|587|993)'
All three should show LISTEN.
All services running:
sudo systemctl status postfix dovecot spamassassin fail2ban
All should show “active”.
fail2ban jails active:
sudo fail2ban-client status
# Should show: postfix-sasl, sshd
Mail queue empty:
sudo mailq
# Should show: Mail queue is empty
S3 backups working:
aws s3 ls s3://[your-bucket-name]/ --recursive --human-readable | tail -5
Test receiving: Send an email from an external account to [your-username]@[your-domain].com and verify it appears in Thunderbird with SpamAssassin headers.
Test sending: Send from Thunderbird (using port 587 SMTP with your mail server) to an external Gmail or Outlook address. Verify it arrives in inbox (not spam).
Check email headers in Gmail to verify SPF and DKIM pass:
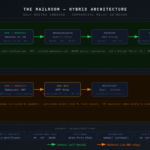
spf=passdkim=passYour mail server now handles the complete email lifecycle:
Incoming mail:
  Internet → Postfix (port 25)
           → SpamAssassin (spam scored and tagged)
           → Delivered to Maildir
           → Accessible via IMAP (port 993)

Outgoing mail:
  Thunderbird → Postfix (port 587, authenticated)
              → SendGrid relay (port 2525)
              → Delivered reliably to recipients
Security layers:
Operational:
| Service | Cost |
|---|---|
| DigitalOcean mail droplet | $6.00 |
| DigitalOcean WordPress droplet | $6.00 |
| AWS S3 backups | ~$0.50 |
| SMTP2GO (relay) | $0.00 |
| Total | ~$12.50/month |
We’re running through SMTP2GO while building AWS billing history. (Originally SendGrid, but two account lockouts forced a migration — see above.) The path to SES approval:
relayhost and sasl_passwd – no other changes requiredThis wouldn’t be an honest guide without documenting what actually went wrong:
SendGrid free tier lockouts: Two accounts were locked without warning — first using a domain email, then using Gmail. SendGrid’s anti-abuse system is tuned for catching spammers at scale, which means legitimate low-volume personal senders get flagged as false positives. The migration to SMTP2GO resolved this. If you’re using any relay’s free tier, have a backup plan.
DigitalOcean port blocking: Port 587 outbound is blocked. Use port 2525 for your relay provider (both SendGrid and SMTP2GO support it).
SpamAssassin integration: The mail loop between Postfix and SpamAssassin is a real issue. The port 10025 off-ramp with empty content_filter is required. The spamd binary path varies – verify with which spamd before configuring.
fail2ban Dovecot filter: The default filter has regex compatibility issues on Ubuntu 24.04. SSH and Postfix protection work out of the box. The Dovecot jail requires filter testing before enabling.
Configuration duplicates: Adding SendGrid relay settings to a Postfix config that already has some of those parameters creates duplicate warnings. Postfix uses the last value and continues working, but clean up duplicates to avoid confusion.
Stale Postfix hash files: After updating /etc/postfix/sasl_passwd with new relay credentials, Postfix kept authenticating with the old ones. The fix: sudo postmap /etc/postfix/sasl_passwd to regenerate the .db file. Postfix reads the binary hash, not the text file — editing one without updating the other is a silent failure.
master.cf typo — permit_sasl_authentication vs permit_sasl_authenticated: A single missing letter (d) in the submission service restrictions caused a 451 Server configuration error on all outbound mail. The restriction is permit_sasl_authenticated (past tense), not permit_sasl_authentication. Postfix logs the exact unknown restriction name, which makes this easy to find if you know to look.
You now have a complete, production-ready mail server built from scratch. It sends reliably, receives correctly, filters spam, blocks attackers, backs up automatically, and alerts you when something needs attention.
Published: [Date]
Last updated: [Date]
Time to complete: 2-3 hours
Part of series: Building a Secure Email Server
Previous: Part 2 – Deployment and Configuration